| 일 | 월 | 화 | 수 | 목 | 금 | 토 |
|---|---|---|---|---|---|---|
| 1 | 2 | 3 | 4 | 5 | 6 | |
| 7 | 8 | 9 | 10 | 11 | 12 | 13 |
| 14 | 15 | 16 | 17 | 18 | 19 | 20 |
| 21 | 22 | 23 | 24 | 25 | 26 | 27 |
| 28 | 29 | 30 |
- 방콕
- Thailand
- 추천 영화
- android app
- 오토바이 여행
- 티스토리
- 추천 앱
- National Park
- Custom ROM
- 아이스크림 샌드위치
- recommended app
- 맛집
- 커스텀 롬
- 태국
- NEXUS S
- 페이스북
- 스마트폰
- Tistory
- khao yai
- agoda
- 칸차나부리
- kanchanaburi
- Bangkok
- android
- 넥서스 S
- 안드로이드 앱
- motorcycle travel
- 아고다
- 카오야이
- 안드로이드
- 어제
- 오늘
- 전체
삶을 누리는 디비누스
구글 웹로그 분석 어널리시스 Google Analytics 본문
블로그를 시작하면서 제일 궁금한게 블로그 통계이었는데요... 네이버나 다음 같은 블로그는 통계 서비스가 월별, 일별 볼 수 있도록 잘 되있는데...
As i started to blog... i wanted to have accurate stats... stats provided by naver or daum is ok... has ability to check by month or by day...
티스토리 블로그는 통계가 영 않좋더라고요...
but stats for tistory blog wasnt really that good...
Tistat이라는 간단한 프로그램으로 분석이 가능해 졌지만... 턱 없이 부족하죠...
you could use the simple program called tistat... but it lacked many features...
제가 원하는 기능은... 아래와 같죠...
i wanted the following functions...
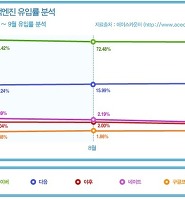
1. 키워드: 어떤 키워드로 내 사이트를 검색해서 들어왔나...
1. keyword: how did people find my website... what keywords did they use...
2. 유입 경로: 어떤 경로로 통해서 들어왔고.. 어떤 검색 엔진을 사용했는가..
2. referral path: through what means did they come in.. and what search engine did they use...
3. 인기 포스트: 어떤 포스트를 가장 많이 봤나...
3. popular post: which post was viewed the most...
4. 월별 일별 방문자... 그래프로도 표현
4. monthly or daily visitors... shows as graph as well...
등 등인데... 티스토리 통계는 물론 네이버 및 다음 통계도 쫌 떨어진다..
not to mention tistory stats... but even stats for naver and daum is lacking in this aspect...
그러다가 발견한 구글 웹로그 분석!!!
than i found google analytics!!!
완전 제가 원하는 기능은 물론 더 많은 것들을 제공한다... 심지어 유저들이 들어와서 무엇을 클릭했는지... 어떤 브라우저를 사용하고 OS를 사용했는지 까지도...
It has all the functions i want and more... it even monitors insite clicks... where user clicked... what browser they are using.. and even what OS they are using...
오늘은 구글 웹로그 분석 어널리시스를 설치하는 방법을 알아봅시다...
lets learn how to install google analytics today... shall we?
일단... 구글 계정이 있어야겠죠? 쥐메일을 사용하면 그 이멜 쓰면됩니다... 없으시면... 구글가서 만드세요...
first of all... you should have google account... if you have gmail, you can use that... if not... go make it at google...
1. 아래 주소로 이동하세요...
1. move to the following address...
http://www.google.com/intl/ko/analytics/

2. '웹로그 분석 액세스'를 클릭하세요
*여기서 상단에 있는 설정에 들어가서 언어 바꿀수 있어요.. 한글 있습니다!
2. Click on 'Access Google Analytics'
3. 새 계정 만들기로 들어가서 '가입'하세요!
3. 'Register' on new account
'웹사이트 URL'에 자신의 블로그 주소를 입력하고 '계정 이름' 선택하세요. 나머지는 그냥 화면 따라가면 됩니다..
type in your 'Website URL' and 'Account Name'... and follow the instructions on the screen...
4. 계정을 완성적으로 만들었다면 다음과 같은 코드가 나옵니다... 이코드를 님 블로그 <head></head> 사이에 삽입하여야 합니다! 저 빨간 상자는 개인 코드이므로 센서... ㅋㅋ
4. after you successfully created the account, you will see the following code... all you have to do is to copy the copy between <head></head> section of your blog... the red box is the personal code...

님 블로그 헤드에 삽입하실때 센스있게 <script> 앞에는 <!-- 구글 Analytic 시작 --> </script> 뒤에는 <!-- 구글 Analytic 끝 -->... 그러면 깔끔하겠죠?
to be more organized, you could put <!-- Google Analytic Start --> in front of <script> & <!-- Google Analytic End --> at end of </script>...
5. '저장 후 종료'하면 마무리가 됩니다. 코드를 제대로 삽입했다면 하루에서 이틀 정도 사이에 상태 표시가 체크 표시로 바뀝니다!
5. 'Save and Exit' to finish... if you inserted the code properly... the status will change to green check mark within a day or two...
이제 보고서 보기 들어가면 원하시는 통계를 확인하실 수 있습니다! 방문자부터 시작해서 트래픽 소스(유입 경로)!!! 콘텐츠 가시면 인기 포스트도 확인할 수 있습니다!
Now you can 'View Report'! you can check number of visitors, referrals (Traffic Source) and top posts under 'Content'...
다음에 구글 웹로그 분석에 구글 에드센스 연동 방법도 알아보겠습니다!
Next... we shall learn about connecting your google adsense to google analytics...
여기서 한가지의 문제점을 발견할 수 있는데 그건 바로 티스토리 통계와 구글 웹로그 또는 구글 어널리스트 통계가 다르다는 것입니다...
이유는 여러가지가 있지만 가장 큰 이유는 바로 시간대이지요...
티스토리 집계는 한국 시간으로 집계가 되고 있습니다... 즉 새벽 1시가 되면 0으로 돌아가는 거죠...
근데 구글 어널리스트는 미국 시간으로 집계가 되고 있습니다... 기억으로는 PST 1 시간대였습니다... (그리고 아직 시간대를 바꿀 수 있는 기능이 없다고 하네요)... 그러므로 구글 어널리스트 집계는 한국 시간으로 새벽 6시부터 저녁 6시까지의 통계라는 것이지요...
그리고 그거 아니라도 검색 엔진의 로보트가 뜨면 방문자수가 막 뛰어 오르는 것을 보신적 있을겁니다... 그럴 경우 티스토리는 2000이 넘는 집계가 나오지만 구글 어널리스트는 900 밖에 않보이는거죠...